I was determined to give somehting handmade to my husband for Father’s Day this year – something Birdie could make with me. I’ll admit it though, I turned into one of those moms, and, well, I kind of took over in the end. Birdie and her daddy need quiet things to do at the end of the day when he comes home from work, and this Eye Spy Bucket is a great solution.I found the idea thanks to Modern Parents Messy Kids, who in turn found it over at Pink and Green Mama. (Sidebar, both of these blogs rock! Check them out!).

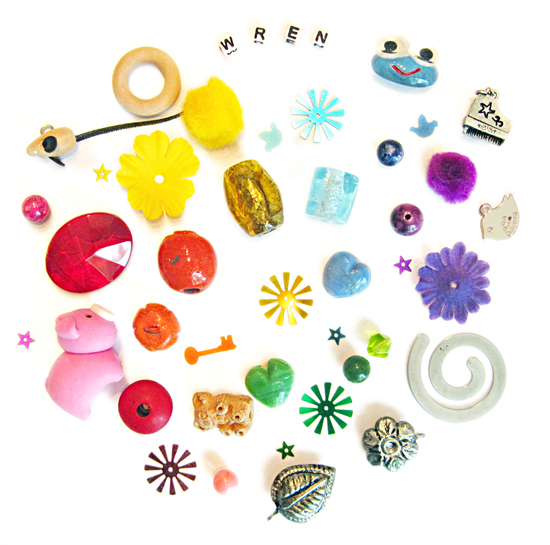
So. we found a fun container, rice, food coloring + alcohol, hot glue, beads, trinkets, sequins, buttons (I LOVE our lil’ wooden mouse buttons), charms, and other randomness. My only stupid moment? Starting on the Friday before Father’s Day. We had to get it done before he got home – and we failed miserably! Birdie’s need to grab the little treasures every moment I tried to take their photo (for the bottom of the bucket) didn’t help. Luckily he slept in Sunday morning while I added the finishing touches. (and thank you darling Katherine, our nanny, for helping us dry out the rice and hide the evidence from him!).

The tutorial from Pink and Green Mama is very straightforward, and dying the rice is pretty easy. Here are some extra tips I learned along the way:
- Next time I definitely want to try the liquid watercolors she mentions. We used food coloring, and the colors are just not as vibrant. I want more color!
- Surprisingly, heavier objects work better than lighter ones. I thought they’d fall too fast and end up buried at the bottom. But they’re the easiest to find when you rotate the bucket.
- Little bits of paper, sequins, and fabric flowers gather static in this flexible plastic, so they end up glued to the edges, and don’t hide themselves.
- Play with the amount of rice you use – the more the rice, the less it moves around, making it harder to find things. Older kids might prefer that. For Birdie, who’s 2.5, I left some extra room so the rice has more room to move, revealing the hidden gems faster.


{ 7 comments… read them below or add one }
We usually use liquid food coloring for our rice, you just need to use a lot more if you want brighter colors!! Love the finished project and thanks for the linky love!
: ) Fondly,
pink and green mama,
MaryLea
Good to know – I should have just gone for it, but I was using these weird gel colors, and it seemed like they were making the rice darker not brighter. Will need to find the classic food dyes!
Thanks for posting this tutorial…I’d gone hunting for one after I saw your sweet Eye Spy bucket!
Yay! I’m sure Freja will love it, she seems like a very curious little girl (my favorite kind).
Turned out great! Dana over at MADE also has a fab tutorial for dying rice lots of vibrant colors. I used it to make baby shakers for my DIY Easter baskets and they turned out wonderful :).
Thank you for this post! I have found a lot of trikes around the house. I also bought the letter beads to spell out each of my nieces and nephews names. All my 8 of my nieces and nephews will be getting one of these for Christmas! Not only will their names be in them but a little something special for reaches likes or characters.
1 plays baseball- I found a mini bat and glove at hobby Lobby.
1. Sings- mini microphone and music note
1 loves westerns and playing cowboy- mini cow boy hat and boots.
1 loves monkeys- found some mini monkeys
1 loves to shop- mini shoes and purse.
The list goes on! I can’t wait to see their reaction on Christmas Day to this fun gift!
That’s so awesome – they’re going to love them! Thanks for sharing your ideas!
{ 1 trackback }