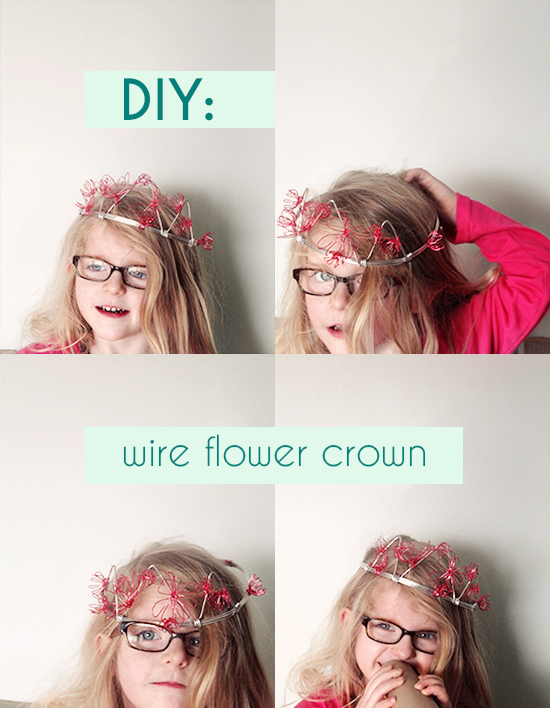
She’s hitting her Princess phase. Oh dear, I’ve been dreading this! But so far, I’ll admit it’s been fairly manageable. She may love princesses and the color pink, but this weekend we spent a significant amount of playtime making Lego airplanes and playing with her new Hot Wheels race track (thanks Grandma and Grandpa!). So far, I think I can handle this.
But I’ll be extra creative with the princessy pink things she’s dying to have. Like this crown. We had a cheap plastic monstrosity that broke into at least 10 pieces about a month ago, and she began pleading for a new one. Well, hey, what a perfect excuse for me to put my creative crown hat on!
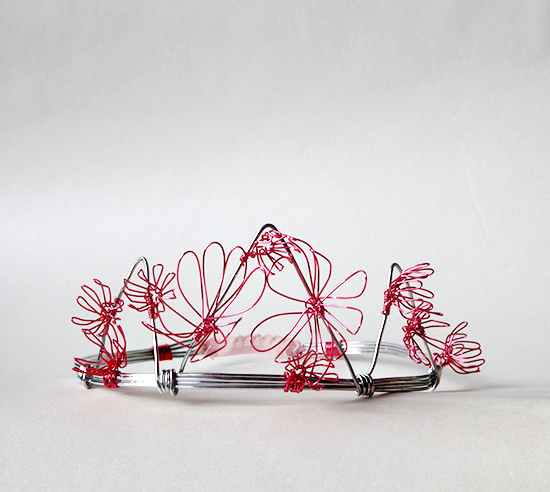
This little wire crown with adjustable elastic back is my solution to our princess crown dilemma. It’s not the sturdiest of crowns, but Birdie knows to treat it with special care. Plus, if the wire gets bent out of shape, it’s easy to bend back – believe me, I know. Also, think carefully about where you leave the ends of the wire as you wrap and cut, so that the sharp bits won’t rest against your little one’s head!
What you’ll need:
- 14 gauge aluminum jewelry wire
- 26 gauge colored copper jewelry wire (I used, sigh, pink)
- a small amount of 1/4″ wide elastic (I used, again, pink)
- needle and thread to match elastic
- masking tape
- small pliers, sturdy hands, and a wire cutter
What you’ll do:
- Begin by determining the measurements of your child’s head. I know Birdie’s head is around a 21″ circumference, so I actually made the crown that size as well. It sounds big, but I wanted it to sit down on her head (with the help of the elastic), versus perching on top of it.
- With your 14 gauge wire, create a U-shaped piece of wire that will fit the circumference you need. Then double-back on itself 3 times, so you have a crown base that is 4 pieces of wire thick. Do not cut the wire to do this, but use one continuous piece. Take a look at the 2nd to last photo to see how the ends of the crown should look at the back. Make sure to create a loop on each end for your elastic to wrap around.
- Use masking tape and wrap it around these 4 layers of wire to keep them stable while you wrap wire around them in the next steps.
- Now, take a 2nd piece of 14 gauge wire and create the front of your crown. The design is up to you, I chose to do 3 points, with the center point higher than the outer two points. Between each point I wrapped the wire around the base a couple of times. I also alternated wrapping front to back and back to front, to make them a little bit sturdier.
- With your 26 gauge wire, wrap several times around each end of the crown at the back, to help the base hold it’s shape. Tuck the ends of the wire in under the wrapped area – this wire is thin enough you can almost work with it like a piece of cording.
- Now for the flowers! All the flowers on this crown were created using this same technique. Just change the size of your loops to change the size of your flower.
- Leave 5-7 inches of wire, and then begin creating the wave pattern shown in the photos. I used 8 loops for my flowers, but you could try less or maybe a couple more as well.
- Measure out another 5-7 inches after your loops, then cut your wire. Take one end of the wire, curve around to the beginning of the loops at the other end, and thread it through the base of your loops as if you are sewing them together. Weave the wire through the back and front of each loop.
- As you near the end of this weaving, begin pulling tight. At the end, pull the wire tight and you will cinch up all of the loops to create your flower. This is kind of magical, I’ll admit it. Then wrap the wire around the other wire tail a couple of times to secure things.
- Adjust your petals, you can also bend them slightly inwards with your fingers to create a curved flower bud.
- Attach your flower to your crown. Make another!
- Note: Most of the wire bending and manipulation I did was with my hands. the pliers came in handy when trying to tighten things up – whether it’s wrapping the wire at the back of the crown, or wrapping the wire ends of your flowers to the crown. Once you’ve wrapped the wire, clamp down on it with the pliers to help it “mold” to the area you’re wrapping. Note: regular household pliers will work, but the ridged grips will leave marks on your soft wire. Cover them with masking tape or some other soft material first!
- When you’re done with your flowers, cut off a small section of elastic, thread each end through the wire loops on the backside of your crown, and sew it together. Now find your little Princess and watch her swoon!
Happy crown-making everyone! Feel free to leave a comment if you have any questions and check out more DIY ideas here!


{ 0 comments… add one now }
{ 1 trackback }