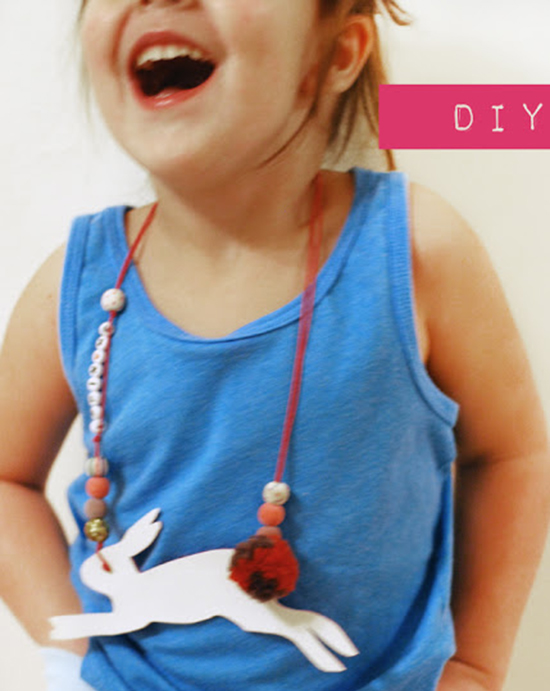
I’m so excited to share this amazing tutorial with you today! Celina, from the gorgeous Petit à Petit and Family blog, has generously agreed to share this massive and very very awesome necklace DIY for your kids. She’s done it all – from kool-aid dying the pom pom yarn, to making the beads, to the amazing animals themselves. Each step would be a fun afternoon project, and the end result is pretty amazing. Or, you could gather up pre-made poms and beads and skip straight to those adorable animal pendants too! Thanks Celina!
YOUR FAVORITE ANIMAL NECKLACE.
In this DIY you’ll need some Kool Aid, some Silk Screen Foil, some glitter, a few permanent makers and the list goes on and on….
We will be dyeing wool and wooden beads with Kool Aid, then we will decorate some plain wooden beads with glitter and create cute patterns with permanent markers, lastly we will create some animal silhouettes to create the main part of our necklace.
To make this tutorial easy on everyone, I’ve separated it into a few blocks- in the end it will all come together, I promise!
So are you ready?
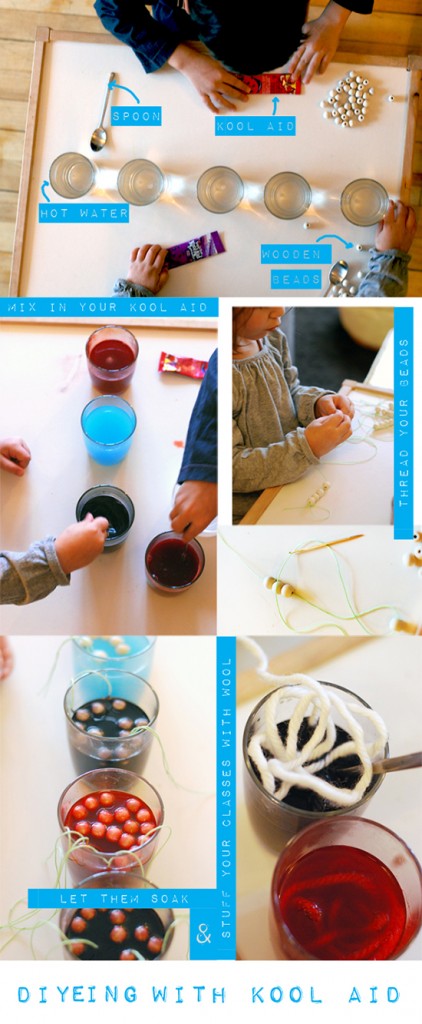
First we do some Kool Aid dyeing…
- Different colors of Kool Aid- sugar free (I could only find 3 colors: Cherry, Grape and Ice Blue). Then I also mixed all the colors together and got a brownish colors.
- Natural wooden beads- light color and unvarnished.
- Natural or white wool. *** your yarn must be composed of wool or silk for the dye to stick. Kool Aid only works on protein based fibers.
- Hot water.
- Spoon.
- String and needle.
- Paper towel.
WHAT TO DO:
- We filled 4 classes with hot/ boiling water and stirred in about 1-2 tablespoons of Kool Aid of each color.
- We divided our beads into 4 and strung them.
- This makes it easy to pull out the beads from the glass and use the the dye mix for the wool later.
- Add the beads to the mix and stir often. We let the beads soak for about 5 minutes.
- Pull the beads out and let them dry on some paper towels.
- Next we put as much wool as we could fit into our dye mix.
- Then we microwaved the glass with the wool for about 2 min.
- We let the wool sit in the Kool Aid dye mix until the water was almost clear.
- Lastly rinse your wool and let dry.
The great thing about dyeing with Kool Aid is that you can get the kids involved, it’s non-toxic and it will not stain and it smells really good.
Next we prepare the beads…
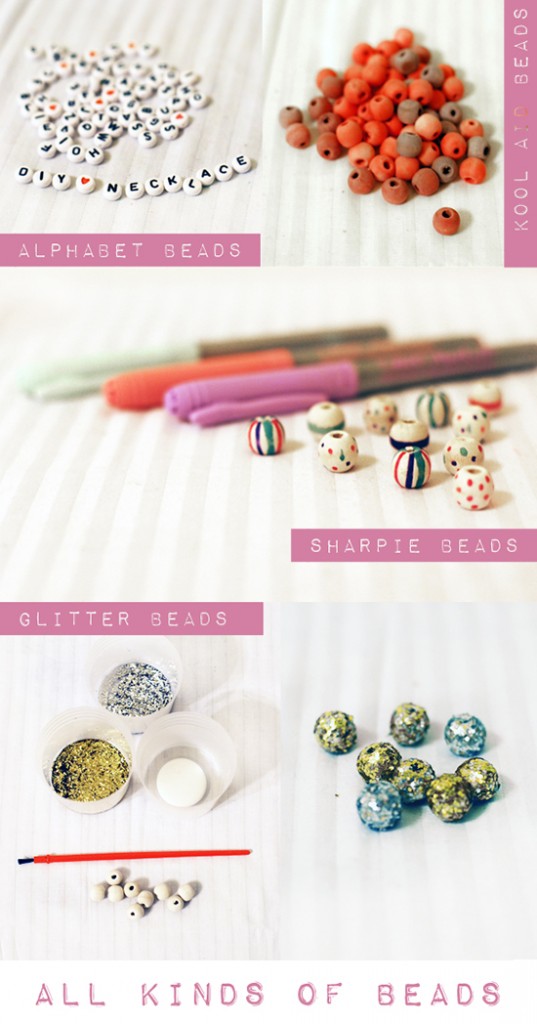
- I bought the alphabet beads in the Craft section at Walmart.- I used the Kool Aid beads.
- With permanent markers I decorated some natural wooden beads. I made stripes and dots.
- For the glitter beads, I covered my wooden beads with some white glue, then mixed them in my glitter. I made some gold beads, silver beads and a mix of the two. Then let them dry. Once dry I coated them with Modge Podge, this helped the glitter not fall off- a lot!
You can use any type of beads for your necklace, but these were a lot of fun to make.
Now get ready for some Pom Pom making…
 WHAT YOU NEED:
- Yarn
- Fork ( small and big).
- I used a large fork for mixing salad. The straight the edges of your fork the better.
- ScissorsHOW TO:
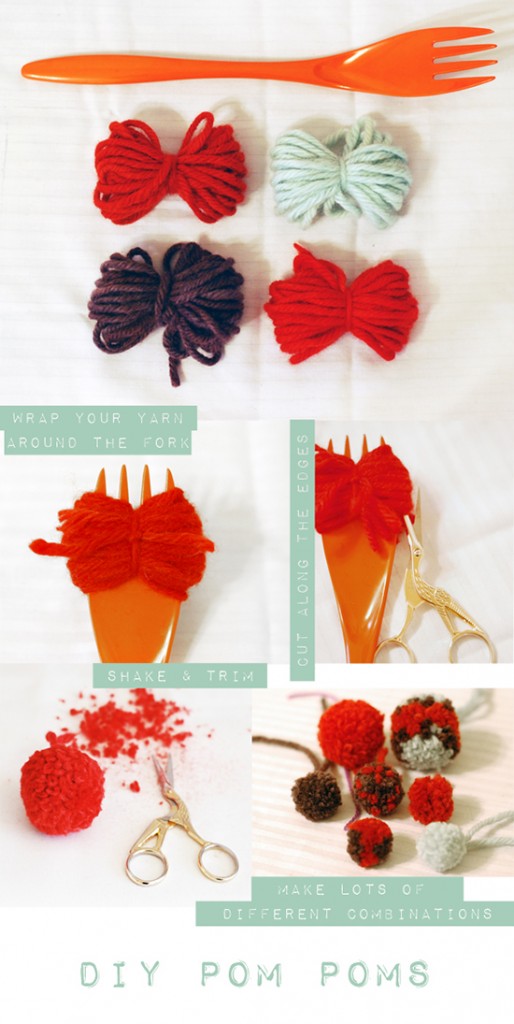
- Cut a small piece of yarn about 15 cm long and place it in the middle of your fork. If you do this first, it will be easier to tie your Pom Pom later.
- Wrap your yarn around your fork. The more yarn you wrap the denser your Pom Pom will be.
- Tie your Pom Pom as tightly as you can.
- Cut along the edges of your fork.
- Remove your yarn, shake it and roll it your hands like if your making a meat ball.
- Cut and trim the ends to make your Pom Pom nice and round.
Use different size forks for different size Pom Poms, play with colors. The more you make them, you’ll get an idea of where your different colors will end up and you can come up with some really interesting Pom Poms. I am totally addicted!
And now we prepare the animals…
 WHAT YOU NEED:
- Animal Font.
- Computer and Printer.
- Paper.
- Scissors.
- Pleather or leather
- Felt.
- Heatbond.
- Iron and piece of cotton fabric.
- Washable Crayola marker.
- Nail or sharp tool.
- Silk Screen Foil paper.
HOW TO:
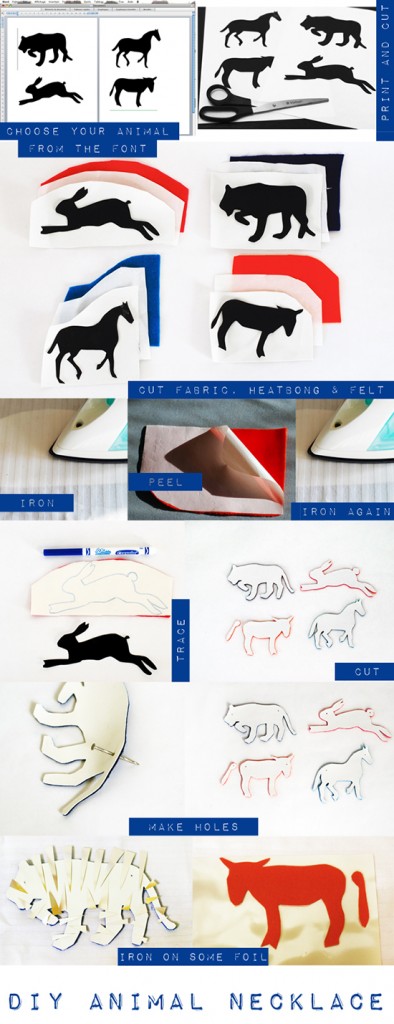
- First you’ll need to download and install the Animal font. I used the one by Alan Carr from DaFont.com. There are lots of animal silhouettes to choose from, it’s pretty awesome. I’ve made shadow puppets from these too.
- In Word or any other program, choose which is your favorite animal. I made it so that 2 animals would fit on 1 page, approximately 13 cm wide.
- Print and cut out the silhouettes.
- Grab your pleather or leather, heatbond and felt. Cut all three a little bigger than your animal and all three being the same.
- Iron the heat bond to the back of your pleather or leather. BE CAREFUL NOT TO MELT your pleather. I did! It is plastic after all. I used a piece of cotton fabric to protect my pleather when ironing.
- Let cool and peal off the backing of the Heatbond.
- Iron onto the felt, using the same technic. Be careful the felt can melt too.
- Make sure the Heatbond is well ironed and that your felt is well glued to your pleather.
- Trace your silhouette. I use a washable marker so that I can wipe the maker a way once I’m done.
- Cut your animal silhouette. You might need to iron your fabric once again, if you see the piece or edges unstick.
- With a nail or sharp tool, make 2 holes. I made one where the eye of the animal would be and one on the other end.
- If you want to add some shine, use some Silk Screen Foil. This foil will stick to leather or pleather just with some ironing. I created some stripes for my tiger by cutting some triangles and arranging them all around my tiger silhouette.
- For the donkey, I cut a piece of foil slightly bigger than my silhouette and covered my entire donkey.
Once again use your piece of cotton, cover your animal and iron for the foil to stick, than peel off.
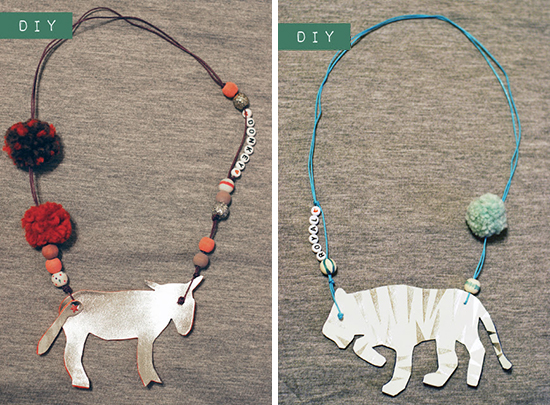
Lastly… grab some cord/string and a needle and put it all together. Decide how long you want the necklace to be. I made mine approximately 55cm long ( string length only), so I cut a piece of string approx. 1m25 for knotting and ease.
- Pull your cord through the whole that is on backside, not the eye. Fold in two. Make a knot.
- Add some beads. Make a knot to keep the beads in place.
- Tie a Pom Pom or two. Proceed to the other side. make a knot.
- Add some more beads. Personalize with a name or a sweet message. Make a knot.
- Pass only 1 piece of cord thought the back of the eye hole. Grab both ends of your cord and make a very tight knot, twice. Cut the ends. Add some glue if you like. This will create the eye of animal.
We had so much fun making these, I sure hope you will too.I’m thinking of adding these to my shop… what do you thing?








{ 4 comments… read them below or add one }
Thanks for having me Mari!!! I hope you are enjoying your holidays and maybe trying out some kool aid dyeing :) Happy New Year! and ALL the best in 2013.
This is an INCREDIBLE post – love it!! Playdate to try these out for sure!! <3
This is AMAZING! I can’t wait to spend an afternoon making them with my little ones too.
This is so awesome!! So many ideas in one. I love it!
{ 2 trackbacks }