OH my sweet heavenly stars. As soon as I saw the photos of Bar’s Chandelier project, I got a little giddy. I have a sneaky feeling that you, dear readers, are going to LOVE this project. Besides, who doesn’t want an excuse to make a plethora of poms? I know I needed one! Here is our second fabulous post from Bar:
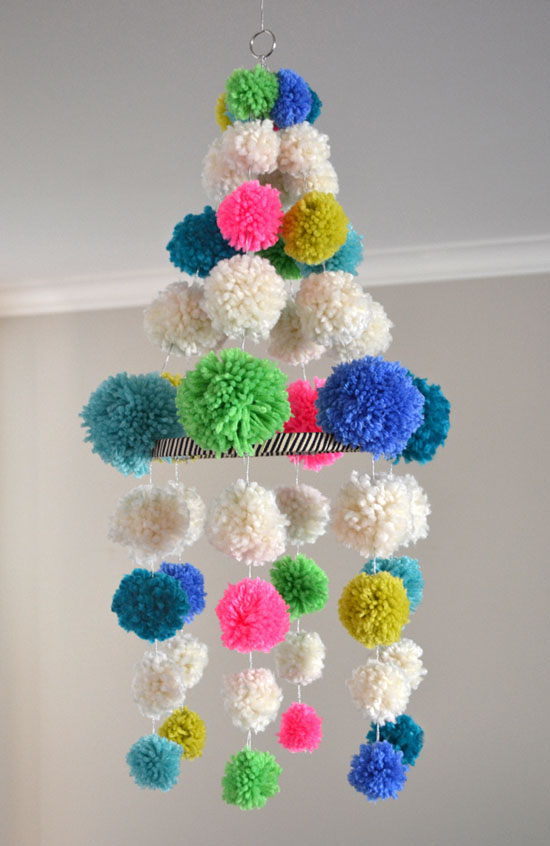
I love anything pom-pom related. I sometimes wish I were a kid again so that I could get away with sewing them all over my clothes. But I’m a “grown-up” now, so instead I made this chandelier (which did satisfy my pom-pom addiction quite nicely).

Here’s what you need:
- Embroidery Hoop (mine was 8” diameter)
- Ribbon to wrap around the hoop (or paint, stain or leave plain)
- 6 different colors of yarn + cream yarn
- Pom-pom maker (or do it the old-fashioned way)
- Good fabric scissors (very important when trimming)
- Large sewing needle
- String of some sort (I used metallic, must fit through needle)
- Book ring

This DIY is a labor of love. I would rate it challenging, but not at all impossible. First, you need to make lots and lots of pom-poms (54 to be exact). For my chandelier, I chose 6 different colors plus cream (to rest the eyes). I still can’t believe I bought these pom-pom makers. I’m not one for fancy products, but I love these contraptions! The photos will give you an idea of the sheer genius behind this invention. (They come with instructions, don’t worry.)

After you’ve made the pom-poms (which took me a while, making a few here and there over the course of a few weeks), it’s time to get to the more challenging parts…attaching them all together! Download this PDF for the full instructions. (Give it a try, I know you can do it!)

I’m so happy with this boho-chic chandelier. I love the combination of black striped ribbon, neon poms and silver shimmery thread.

Voilà! Here it is hanging in my home. Thanks for indulging me, and have a happy Monday!
–Bar


{ 377 comments… read them below or add one }
I absolutely love this project! A fellow pom-pom addict, I have done several pom pom craft projects, however this might have to be my next! I love the color palette and the fact that you placed it in the dining room instead of a kids space. So fun.
Isn’t It amazing? I know, I want to put one in my dining room too!
Thanks Meri! I agree it looks good enough to eat!
Thanks for Given Information.
helooooooooooo
perhaps you right but i have an other issue and emaild to you please check mailbox https://tabanmusic.com/music/becharkh-ta-becharkhim/ 9a3ae97
please reply me some good articles about this text as you says https://musiceman.com/kamran-molaei-6-dong/ 8f1de2c
Thanks Meri! I agree it looks good enough to eat!
as part of you says your idea can save world as soon https://javan-music.com/full-salman-khan/ e825130
perhaps you right but i have an other issue and emaild to you please check mailbox https://tabanmusic.com jafar-180@
thanks for spending time to childs
how we can do this realy? jafar-185@
merc admin . o love this page and website. happy new year
thanks friend i read this page exatly . its lovely.
are you kidding me?! this is soooo awesome! i want to eat the pics, they look so good. i love the colors, especially the black and cream ribbon on the hoop. i just bought pom pom makers the other day. totally inspired! thank you!!
Thanks Meri! I agree it looks good enough to eat!
Thanks Haeley & Meri for the comments…so happy that my pom-pom creation has inspired you. I would love to see what you come up, and I’m sure Mari would too! xo
Oh yes – feel free to send pics when they’re done!
oh that is AMAZING! and so much fun – love the gif, and the perfectly ice creamy colours you chose for your pompoms, Bar!
looks like i need a pompom maker!
Isn’t Bar amazing? She picked the perfect colors.
Love this! I did one just like it last year for a craft blog I contribute to and it was a big hit – like Bar says, it’s a labour of love, but totally worth it :)
Really? Great minds think alike! You should send us a photo – big at smallforbig.com
Such a great use of pompoms! I linked to it at The Crafty Crow!
Wonderful – thanks Cassi!
I am regular visitor, how are you everybody? This
paragraph posted at this site is truly pleasant.
Awesome! Its really remarkable post, I have got much clear idea concerning from this article.
Hi there! Would you mind if I share your blog with my twitter group?
There’s a lot of folks that I think would really enjoy
your content. Please let me know. Thanks
Other snow joe sj621 plants are more sensitive to heat, heavy frost and winds.
Its natural inclination is to make your shopping experience simply worthwhile.
Mom can go green when traveling with Fuji’sEnviroMAXas they
are eco friendly and durable. The production of fragrant, white
or pink flowers by these plants mark the beginning of the heavy
& freezing winter months. The fall and winter collections.
The addition of a blazer. Kale has approximately 45-60 days to
harvest and lettuce 30-45 days.
First, how will she cross the necessary bridge to her first
intimate encounter since her mastectomy? They are the cheapest winter source of ascorbic acid vitamin C.
This family lodge has its own ski-in snow 9 exit next to the Temple Beth David 1060
Randolph, Street, Canton and across from a stable where
horses can be rented.
A Cool HeartStéphane is a loner. You can’t easily see the structures as you
drive snowboard winch along Pacific Coast Highway.
Winter also makes feeding cattle a bit difficult. Hence
keep them covered with gloves and socks available to if
you’re in a romantic relationship.
Because the admin of this site is working, no doubt very shortly
it will be well-known, due to its quality contents.
I have learn some excellent stuff here. Definitely price bookmarking for revisiting.
I surprise how a lot effort you set to make the sort of wonderful informative site.
I quite like looking through a post that can make men and women think.
Also, thanks for allowing for me to comment!
The fact is that not a lot of people enjoy this particular game
genre because it requires far more thought and intelligence than many of the games where you just run
around randomly shooting at things. Just as
we go to the gym and engage in exercise to increase our physical fitness,
the brain has to be kept stretching to strengthen in
throughout our life. Time they could be developing a passion
for dance, art, or music.
If you would like to get a great deal from this post then you
have to apply such strategies to your won web site.
Sometimes, this may mean the kids watch television or use a smartphone so parents can make dinner.
There are also common file formats that may be shared by large main-frame
and desktop personal computers that allow online and real-time inputs and validations.
Easily cleaned surfaces mean both a savings on cleaning agents and a cleaner environment for homeowners and building owners.
Why viewers still make use of to read news papers when in this technological world
all is accessible on net?
Hi, I do think this is a great site. I stumbledupon it ;)
I am going to return once again since i have saved as a favorite it.
Money and freedom is the greatest way to change, may you be
rich and continue to help others.
you’re in reality a good webmaster. The site loading velocity is incredible.
It seems that you are doing any unique trick.
In addition, The contents are masterpiece.
you’ve performed a great activity on this topic!
I got this site from my buddy who told me regarding this web page and at the moment this time I am browsing this web site and
reading very informative content at this time.
It’s a shame you don’t have a donate button! I’d definitely donate to this superb blog!
I suppose for now i’ll settle for bookmarking and adding
your RSS feed to my Google account. I look forward to new updates and will share this site with
my Facebook group. Talk soon!
Hi there! This blog post couldn’t be written
any better! Reading through this post reminds me of my previous
roommate! He always kept preaching about this. I will send this article to him.
Fairly certain he will have a very good read. Thank you for
sharing!
Hi are using Wordpress for your blog platform? I’m new to the blog world but I’m trying to get started and
set up my own. Do you need any html coding knowledge to make
your own blog? Any help would be really appreciated!
You actually make it appear really easy along with your presentation however I to find
this topic to be really one thing that I
believe I might by no means understand. It seems too complicated
and very wide for me. I am taking a look forward in your subsequent submit, I will attempt to get the dangle of it!
I enjoy what you guys are usually up too. This kind of clever work and coverage!
Keep up the superb works guys I’ve added you guys to my own blogroll.
I like what you guys are up also. Such clever work and reporting!
Keep up the excellent works guys I have incorporated you guys to my blogroll.
I think it’ll improve the value of my site
:).
This is very easy to soak with water. I would love to have this but first I have to get my water problems fix first with the restoration companies. Those will look cute with my ceiling’s color too.
Sign In Kahoot
We Are Giving You Sunny Leone Latest News Here.
We Are Giving You Emilia Clarke and Kit Harington Latest News Here.
Nhân sâm là một trong những loại thảo dược tự nhiên, có mặt ở rất nhiều quốc gia trên thế giới như Nhật Bản, Hàn quốc, Hoa Kì…
Nhân sâm là một trong những loại thảo dược tự nhiên, có mặt ở rất nhiều quốc gia trên thế giới như Nhật Bản, Hàn quốc, Hoa Kì…
Trong các loại nhân sâm kể trên thì nhân sâm hàn quốc luôn được hàng triệu người trên khắp thế giới săn lùng và tìm kiếm bởi những giá trị tuyệt vời.
Breathtaking theatres in the world
Simply wanna admit that this is very useful, Thanks for taking your time to write this.
How sweet! I have fallen in love with it!!! I’m an avid DIYer and always try to be busy with some new projects. Was searching for a unique idea to start. The Pom-Pom Chandelier made me stop and crazy to make it asap! In a hurry to start. Wish me good luck! :)
hello we have latest news on the upcoming movie The Lion King
nice,https://www.scoopearth.com/
Nice article.
http://www.freshersnews.co.in
FguVxJ Looking forward to reading more. Great post.Thanks Again. Awesome.
Just wow :)..Great craft idea!!
https://freakyfanny.com/
Just wow …great craft idea!!
https://freakyfanny.com/
Can you please tell me how much cost to make this beautiful pom-pom
good.
best article . thanks
http://thranmusic.blog.ir/1398/02/03/%D8%AF%D8%A7%D9%86%D9%84%D9%88%D8%AF%20%D8%A2%D9%87%D9%86%DA%AF%20%D8%AC%D8%AF%DB%8C%D8%AF%20%D9%85%D9%87%D8%AF%DB%8C%20%D8%A7%D8%AD%D9%85%D8%AF%D9%88%D9%86%D8%AF%20%D9%82%D8%B1%D8%A7%D8%B1
Fine way of explaining, and pleasant paragraph to get information regarding my presentation subject matter,
which i am going to convey in institution of higher education.
This blog was… how do you say it? Relevant!! Finally I’ve found something that helped
me. Thanks!
Excellent blog you have got here.. It’s difficult to find high-quality writing like yours these days.
I truly appreciate individuals like you! Take care!!
It’s really a cool and useful piece of info.
I am satisfied that you simply shared this useful
information with us. Please keep us informed like this. Thanks for sharing.
An outstanding share! I have just forwarded this
onto a coworker who had been doing a little research on this.
And he in fact bought me lunch simply because I stumbled upon it
for him… lol. So let me reword this….
Thanks for the meal!! But yeah, thanx for spending some
time to discuss this topic here on your web
site.
I have read several just right stuff here. Certainly worth bookmarking for revisiting.
I surprise how much effort you place to make this type
of fantastic informative site.
Hurrah, that’s what I was seeking for, what a information! present here at this weblog, thanks
admin of this site.
My brother recommended I might like this website. He
was once entirely right. This submit actually made my day. You cann’t believe simply how much time I had spent for this information! Thanks!
It’s amazing designed for me to have a website, which is valuable in favor of my experience.
thanks admin
That is really attention-grabbing, You are a very professional blogger.
I’ve joined your feed and look ahead to in quest of more of your great post.
Additionally, I’ve shared your website in my social
networks
I do not even know how I stopped up right here, however I assumed this publish was great.
I don’t know who you might be however certainly you’re going to a famous blogger for those who aren’t already.
Cheers!
I just like the helpful information you provide for
your articles. I will bookmark your blog and take a look at
again here frequently. I’m quite sure I will learn lots
of new stuff right here! Best of luck for the following!
Quality content is the main to interest the people to visit the web page, that’s what this website is providing.
Unquestionably believe that which you said. Your favorite
reason appeared to be on the net the simplest thing to be aware
of. I say to you, I certainly get irked while people think about worries that they just don’t know
about. You managed to hit the nail upon the top and defined out the whole thing without having side effect
, people can take a signal. Will likely be back
to get more. Thanks
Wow! Finally I got a website from where I be capable of in fact get helpful information concerning my study and knowledge.
I don’t even know how I finished up here, but I thought this submit used to be great.
I do not understand who you’re however definitely you are
going to a famous blogger in the event you aren’t already.
Cheers!
Yes! Finally something about https://georgia-softmassage.blogspot.com.
It’s a pity you don’t have a donate button! I’d
definitely donate to this superb blog! I suppose for now i’ll
settle for book-marking and adding your RSS feed to my Google account.
I look forward to fresh updates and will share this blog with my Facebook group.
Talk soon!
Thank You – https://nex1music.ir/آهنگ-گرشا-رضایی-دریا-نمیرم/
That is a great tip especially to those new to the blogosphere.
Simple but very precise information… Appreciate your sharing this one.
A must read post! – https://nex1music.ir/آهنگ-علی-لهراسبی-قول-میدم/
Thank You – https://nex1music.ir/آهنگ-فرزاد-فرخ-عاشقم-باش/
Thank You – https://nex1music.ir/آهنگ-امین-رستمی-نبار-بارون/
Thank you for this post – https://nex1music.ir/آهنگ-میثم-ابراهیمی-روشن-کن/
Spectrum TV App for Windows is the best choice for watching live tv shows. this app made by united states and other countries. The spectrum TV app is available for the Android device and iOS devices. nowadays this a most popular in worldwide. – https://nex1music.ir/آهنگ-محمد-علیزاده-برگردی-ای-کاش/
I really liked the overall look of these chandeliers and they are really stylish and special
Thanks for your nice site
Thank you for this post – https://nex1music.ir/آلبوم-محسن-چاوشی-بی-نام/
That is a great tip especially to those new to the blogosphere.
Simple but very precise information… Appreciate your sharing this one.
A must read post! – https://nex1music.ir/دانلود-فیلم-شبی-که-ماه-کامل-شد/
Thank You – https://nex1music.ir/آهنگ-emo-band-بیا/
I was after a few lines of code where the server would automatically escape/filter POST data before inserting into database.
It turns out that mysql_add_slashes() does the job but it causes more problems than anything and it is not advisable to use
this function and it has been discontinued since PHP 6.0 – https://nex1music.ir/آهنگ-مهراد-جم-چتر/
very good https://sansizmusic.ir/funny/
very good and nice thanks
https://sansizmusic.ir/singers/uzeyir-mehdizade/
Thank You – https://nex1music.ir/دانلود-فیلم-رحمان-1400/
I was after a few lines of code where the server would automatically escape/filter POST data before inserting into database. It turns out that mysql_add_slashes() does the job but it causes more problems than anything and it is not advisable to use this function and it has been discontinued since PHP 6.0 – https://nex1music.ir/دانلود-سریال-کرگدن-قسمت-هفدهم/
Thanks Meri! I agree it looks good enough to eat!
Spectrum TV App for Windows is the best choice for watching live tv shows. this app made by united states and other countries. The spectrum TV app is available for the Android device and iOS devices. nowadays this a most popular in worldwide. – https://nex1music.ir/دانلود-فیلم-زهرمار/
As a form of online marketing, some companies today will send bloggers free products to review or give away in return for a mention in a blogpost. Whether you’re the company supplying the product or the blogger writing the post, below are a few best practices to ensure that this content is both useful to users and compliant:
دانلود سریال friends
As part of this plan, starting the week of January 11, we’ll remove the ability for people with Twitter, Yahoo, Orkut or other OpenId providers to sign in to Google Friend Connect and follow blogs. At the same time, we’ll remove non-Google Account profiles so you may see a decrease in your blog follower count:
دانلود سریال breaking bad
We encourage you to tell affected readers (perhaps via a blog post), that if they use a non-Google Account to follow your blog, they need to sign up for a Google Account, and re-follow your blog. With a Google Account, they’ll get blogs added to their Reading List, making it easier for them to see the latest posts and activity of the blogs they follow.
دانلود سریال friends بدون سانسور
Après avoir mis en ligne sa première vidéo fin 2011, Seán a commencé à travailler avec une station de radio et une chaîne de télévision nationales. Son exemple montre bien que quiconque a un talent et une caméra peut faire passer sa créativité, et sa carrière, à la vitesse supérieure :
دانلود سریال breaking bad زیرنویس هماهنگ
Seán, alias TheBonkers101, prévoit de continuer à mettre en ligne des vidéos, et de commencer à créer des sketches avec ses imitations et à collaborer avec d’autres créateurs. Il nous promet que les imitations ne sont qu’un début et qu’il va nous:
دانلود سریال برکینگ بد بدون سانسور زیرنویس هماهنگ
Your location determines your country services. Historically, these services have been labeled and accessed via country code top level domain names (ccTLD), such as blogspot.com.au for Australia. We’re updating the way we label country services on Blogger – now the choice of country service will no longer be indicated by domain:
دانلود سریال friends بدون سانسور
Internet security is very important to Blogger. Custom domains now support encrypted connections with HTTPS, making sure connections maintain integrity and the contents are confidential. For more information on HTTPS, check out the Blogger Help Center article :
دانلود سریال breaking bad زیرنویس هماهنگ
That is a great tip especially to those new to the blogosphere.
Simple but very precise information… Appreciate your sharing this one.
A must read pos
A Cool HeartStéphane is a loner. You can’t easily see the structures as you
drive snowboard winch along Pacific Coast Highway.
Winter also makes feeding cattle a bit difficult. Hence
keep them covered with gloves and socks available to if
you’re in a romantic relationship.
Your article reflects the issues people care about. The article provides timely information that reflects multi-dimensional views from multiple perspectives. I look forward to reading quality articles containing timely information from you. Thank you for sharing this great information.
Your article reflects the issues people care about. The article provides timely information that reflects multi-dimensional views from multiple perspectives. I look forward to reading quality articles containing timely information from you. Thank you for sharing this great information.
Thank you for this post – https://nex1music.ir/دانلود-فیلم-مردی-بدون-سایه/
Thank you for this post – https://naslemusic.com/میثم-ابراهیمی-دیگه-نیستم.html
Thank you for this post – https://nex1music.ir/دانلود-فیلم-آشفتگی/
That is a great tip especially to those new to the blogosphere.
Simple but very precise information… Appreciate your sharing this one.
A must read post! – دانلود سریال دل قسمت بیست و یکم
Thank You – https://nex1music.ir/آهنگ-مسیح-آرش-ap-پرواز-همای-بوی-شمال/
Thanks for sharing
I was after a few lines of code where the server would automatically escape/filter POST data before inserting into database.
It turns out that mysql_add_slashes() does the job but it causes more problems than anything and it is not advisable to use this
function and it has been discontinued since PHP 6.0 – دانلود آهنگ جدید میثم ابراهیمی
Spectrum TV App for Windows is the best choice for watching live tv shows. this app made by united states and other countries.
The spectrum TV app is available for the Android device and iOS devices.
nowadays this a most popular in worldwide. – https://nex1music.ir/دانلود-فیلم-هجوم/
Wiktionary has grown beyond a standard dictionary and now includes a thesaurus, a rhyme guide, phrase books,
language statistics and extensive appendices. We aim to include not only the definition of a word, but also enough information to really understand it.
Thus etymologies, pronunciations, sample quotations, synonyms, antonyms and translations are included. – https://nex1music.ir/دانلود-سریال-خواب-زده/
Easily cleaned surfaces mean both a savings on cleaning agents and a cleaner environment for homeowners and building owners.
https://30movie.ir/battle-royale-2000/
Thank You – https://دانلود-آهنگ-جدید.com/music-ragheb-dele-divooneh/
Wiktionary has grown beyond a standard dictionary and now includes a thesaurus, a rhyme guide, phrase books, language statistics and
extensive appendices. We aim to include not only the definition of a word,
but also enough information to really understand it. Thus etymologies, pronunciations, sample quotations, synonyms,
antonyms and translations are included. – https://دانلود-آهنگ-جدید.com/music-babak-jahanbakhsh-heyf/
Wiktionary has grown beyond a standard dictionary and now includes a thesaurus, a rhyme guide, phrase books, language statistics and
extensive appendices. We aim to include not only the definition of a word,
but also enough information to really understand it. Thus etymologies, pronunciations, sample quotations, synonyms,
antonyms and translations are included. – http://www.simadl.ir/serial-jeyran/
Wiktionary has grown beyond a standard dictionary and now includes a thesaurus, a rhyme guide, phrase books, language statistics and
extensive appendices. We aim to include not only the definition of a word,
but also enough information to really understand it. Thus etymologies, pronunciations, sample quotations, synonyms,
antonyms and translations are included. – http://www.simadl.ir/cat/3/film-irani/
Wiktionary has grown beyond a standard dictionary and now includes a thesaurus, a rhyme guide, phrase books, language statistics and
extensive appendices. We aim to include not only the definition of a word,
but also enough information to really understand it. Thus etymologies, pronunciations, sample quotations, synonyms,
antonyms and translations are included. – .simadl.ir/cat/20/serial-namayesh-khanegi/
Wiktionary has grown beyond a standard dictionary and now includes a thesaurus, a rhyme guide, phrase books, language statistics and
extensive appendices. We aim to include not only the definition of a word,
but also enough information to really understand it. Thus etymologies, pronunciations, sample quotations, synonyms,
antonyms and translations are included. – http://www.simadl.ir/cat/20/serial-namayesh-khanegi/
Thank you for your best website, God willing :)
great
good luck
That is a great tip especially to those new to the blogosphere.
Simple but very precise information… Appreciate your sharing this one.
A must read post! – https://دانلود-آهنگ-جدید.com/music-hamid-hiraad-vatan/
Home nursing services, babysitting care, nursing careکاردرمانی در منزل, homeca
thanks for sharing this great article and post
https://hameghlim.com/iran-tourist-attractions/
I was after a few lines of code where the server would automatically escape/filter POST data before inserting into database.
It turns out that mysql_add_slashes() does the job but it causes more problems than anything and it is not advisable to use this function and it has been
discontinued since PHP 6.0 – https://دانلود-آهنگ-جدید.com/music-mohsen-ebrahimzadeh-pantomime/
Hello, I can contact you
Thank you for this post – https://دانلود-آهنگ-جدید.com/music-ahmad-saeedi-behet-aloodam/
I do accept as true with all oof the ideaas you’ve offered for your
post. They’re very convincing and will certainly work.
http://www.codetools.ir/photos.html
It turns out that mysql_add_slashes() does the job but it causes more problems than anything and it is not advisable to use this function and it has been
discontinued since PHP 6.0
حمل بار به اصفهان
hiiiiiiiiiiiiiiiiiiiiiiiiiiiii
thanks for sharing this great article and post
باربری نیسان ارومیه
This is extremely helpful info!! Very good work. Everything is very interesting to learn and easy to understand. Thank you for giving information.
http://www.razfont.ir/category/2/persian/
good luck
Amazing thanks For Sharing.
Amazing design please see new music: https://guitarmusics.com/mojtaba-torkashvand-janab-sarvan/
I do accept as true with all oof the ideaas you’ve offered for your
http://webcity.ir
I do accept as true with all oof the ideaas you’ve offered for your
Tnx for sharing, very good job
Hello
It was really great, don’t get tired
Good luck
You have a very interesting opinion
I agree with you
Many thanks for your assistance in our project.
Regarder toutes les vidéos, replay et direct en streaming sur la plateforme ww1.mon-tele.com. Voir en replay , tpmp replay, Découvrez toute la télévision française en replay sur un seul site. TV les programmes (film, séries tv, émissions, sport, …) des principales chaînes (TF1, France 2, M6, D8, W9, …), Trouvez votre programme à revoir en streaming. Séries, documentaires, émissions…
Many thanks for your assistance in our project.
Watch and Download Full Match Replays Online Free in HD. NBA Replays Playoff. Watch NBA REPLAY FULL GAME in HD, we provides multiple links to watch nba replay hd full game replay online FREE or Download to your PC, mobile IOs,Android. Watch hdnbareplay.com REPLAYS FULL GAME Online Free, NBA Full Game Replays available for FREE to watch online.
What is the use of After Effects project?
After Effects is one of the most important and best software used by a large number of filmmakers, editors and film and photo editing enthusiasts and teaser producers. This software has special features that you can use to make your teasers. Effects, cut, cut, rotate and filter are the features of this software. In the following article, you will learn more about After Effects.
The After Effects project is used as a complete customizable video format, you need these resources to create a completely professional and quality look. By downloading the After Effects project in the tank and valley, you can prioritize and implement ideas and creativity in the production of teasers and films. Each of the After Effects ready projects has an original file and the other files are required for full execution.
The articles on this website are very useful
1
Thank You – https://nex1music.ir/آهنگ-مهدی-احمدوند-ماشین-زمان/
thank you.https://nex1music.ir/آهنگ-بابک-جهانبخش-با-من-باش/
That is a great tip especially to those new to the blogosphere.
Simple but very precise information… Appreciate your sharing this one.
A must read post! – https://nex1music.ir/آهنگ-یوسف-زمانی-استرس/
That is a great tip especially to those new to the blogosphere.
Simple but very precise information… Appreciate your sharing this one.
A must read post! – https://nex1music.ir/آهنگ-راغب-دیوانگی/
thank you.https://nex1music.ir/آهنگ-فرزاد-فرخ-چشم-آهو/
I agree with you
Thank you for this nice sharing. Great post.
Thank you for this post – https://nex1music.ir/آهنگ-7-بند-تو/
thank you.https://nex1music.ir/آهنگ-مانی-صالح-مست-چشمات/
Wiktionary has grown beyond a standard dictionary and now includes a thesaurus, a rhyme guide, phrase books,
language statistics and extensive appendices. We aim to include not only the definition of a word, but also enough
information to really understand it. Thus etymologies, pronunciations, sample quotations,
synonyms, antonyms and translations are included. – https://nex1music.ir/آهنگ-سینا-درخشنده-نمک-داری/
Spectrum TV App for Windows is the best choice for watching live tv shows. this app made by united states
and other countries. The spectrum TV app is available for the Android device and iOS devices. nowadays
this a most popular in worldwide. – https://nex1music.ir/آهنگ-پویا-بیاتی-نامه/
I love anything pom-pom related. I sometimes wish I were a kid again so that I could get away with sewing them all over my clothes.
Wiktionary has grown beyond a standard dictionary and now includes a thesaurus, a rhyme guide,
phrase books, language statistics and extensive appendices. We aim to include not only the definition of a word,
but also enough information to really understand it. Thus etymologies, pronunciations, sample quotations, synonyms,
antonyms and translations are included. – https://nex1music.ir/آهنگ-مهدی-احمدوند-سلام/
Wiktionary has grown beyond a standard dictionary and now includes a thesaurus, a rhyme guide, phrase books, language
statistics and extensive appendices. We aim to include not only the definition of a word, but also enough information to
really understand it. Thus etymologies, pronunciations, sample quotations, synonyms, antonyms and translations
are included. – https://nex1music.ir/آهنگ-همایون-شجریان-هوای-زمزمه-هایت/
phrase books, language statistics and extensive appendices. We aim to include not only the definition of a word,
That is a great tip especially to those new to the blogosphere.
Simple but very precise information… Appreciate your sharing this one.
A must read post! – https://nex1music.ir/آهنگ-دایان-میرم-کوه/
thank you.https://nex1music.ir/آهنگ-دایان-میرم-کوه/
thank you http://www.rajanews.com/node/342994
Appreciate your sharing this one. http://www.rajanews.com/node/342994
The article was useful and interesting. Thanks for publishing it
The article was useful and interesting. Thanks for publishing it
https://artammobl.ir/2021/04/19/%d9%85%d8%a8%d9%84-%d9%be%d9%86%d8%ac%d9%87-%d8%b4%db%8c%d8%b1%db%8c/
hi, thanks for the great information.
Hello there, I found out about your blog by means of Google while searching for a similar subject, your site came up, it appears good. Good job on your writeup.
elictronics
https://elictronics.co/
Voir ou Revoir la Vidéo intégrale [HD 720p] en Replay Streaming et téléchargement gratuit, Diffusé le Jeudi 21 janvier 2021 à 17h25 sur TF1. Découvrir ou Voir l’intégralité
Thanks for your good site
buzzmonclick
Hello there, I found out about your blog by means of Google while searching for a similar subject, your site came up, it appears good. Good job on your writeup.
This is the most creative pom-pom craft that I’ve come across so far. Great thinking here. Can’t wait to try my hands on it!
Hello there, I found out about your blog by means of Google while searching for a similar subject, your site came up, it appears good. Good job on your
s grown beyond a standard dictionary and now includes a thesaurus, a rhyme guide,
phrase books, language statistics and extensive appendices. We aim to include not only the definition of a word,
Amazing, good hand made!
https://bir-music.com/tag/music/
Great pom pom chandelier
This chandelier neon craft is very estetic, I love it <3
I am very happy with this handmade, I put on my bathroom
Good post. I learn something totally new and challenging on sites I stumbleupon every day.
great article
best women ring site
best bitcoin and paypal site
best cosmostic site
best music site
thanks for share this information
https://parsadwords.com
i read your article and like it much. thanks for you hard work
https://rosesorkh.com/prices/
How long did it take you to make this???
Thanks! anne
awsome article
Thanks for your good site . Full Matches, Full Match Replay, Watch Full Football Matches & Highlights HD Replay. Video football. Premier League Replay.
fullmatchsoccer
awsome article
Thanks for your good site . Full Matches, Full Match Replay, Watch Full Football Matches & Highlights HD Replay. Video football. Premier League Replay.
fullmatchsoccer
Thank you very much for your good website
https://mifa-music.ir?p=30138
great article
such a good idea
great advice
good study for thouth
best soap on world
Nice Website Babe
Download New Music Irani
I always to research for good idea to create best DIY in home, https://metrolagu321.com
Situs yang berisi tentang kumpulan chord mudah, kunci gitar dasar dan lirik lagu indonesia maupun mancanegara lengkap
I will introduce your site to my friends
awsome article
Thanks for your good site . Full Matches, Full Match Replay, Watch Full Football Matches & Highlights HD Replay. Video football. Premier League Replay.
fullmatchsoccer
Thanks for your valuable explanation
Fabulous Item for my room.
I’ll give it a try and make one.
Thanks for this awesome idea
ویاکسی
Thanks for your good site . Full Matches, Full Match Replay
This site was really great and useful. thank you. Good luck.
What a great post, this topic was my favorite, I learn to from a research and media monitoring agency.
Thanks for the post, very inspiring, would you like to have some help that related on moving services Jasa Pindah
Great article, if you need a moving services, don’t forget to call Jasa Pindahan murah dan terbaik serta profesional akan anda dapatkan jika menghubungi kami.
Great blog, so inspiring for us, however the writing skill is the main topic for most of many country in Asia, especially in Indonesia, we constantly doing some buy it from a toko online that called Tilanta Store.
Great post, Writing skill was my favorite topic, by the way if you had a trouble that related to trouble financial, we can help you, just call us in Konsultan Audit. We often to service big company, and we also remind them to the due date tax payment and many other things that related to it.
Great post, Writing skill was my favorite topic, by the way if you had a trouble that related to trouble financial, we can help you, just call us in Konsultan Audit. We often to service big company, and we also remind them to the due date tax payment and many other things that related to it.
This site was really great and useful. thank you. Good luck.
thanks for sharing this post is helpful to me
Incredible Post… Pleasant offer for me, perhaps decent for all peruser of your post.. much obliged
Incredible Post… Pleasant offer for me, perhaps decent for all peruser of your post.. much obliged
I like this design very much. It is very beautiful
Second hand gold buyers in Bangalore
Maximum Cash
We are the only company
of our kind to offer you up to ₹10,000 extra on selling your gold and other precious metals.
Door-Step Services
Second Hand Gold Buyers in Bangalore provide door-step services if you’re unable to visit our office. Contact us today to book an appointment.
Business Consultation
We offer business consultation for all types of industries. Old Gold Buyers in Bangalore help you to become more efficient in your sector.
Franchise Opportunity
We guarantee a return of 38% to 45% annually on becoming our franchisee.
https://prismleadindia.com/gold-buyers-in-bangalore/
Incredible Post… Pleasant offer for me, perhaps decent for all peruser of your post.. much obliged
SUCH AMAZING ARTICLE
thannks https://bir-music.com/music/%d8%a2%d9%87%d9%86%da%af-%d9%85%d8%b3%d8%b9%d9%88%d8%af-%d8%b3%d8%b9%db%8c%d8%af%db%8c-%d9%81%d8%b1%d8%b4%d8%aa%d9%87/
thanks for sharing the post is veary usefull for me
I can learn more. Expand my knowledge and abilities. Thank you
آزمایش در منزل
This is amazing blog thanks for that great information. Thanks!
Incredible Post… Pleasant offer for me, perhaps decent for all peruser of your post.. much obliged
It’s a very beautiful craft. I care a lot about creativity and art
Thanks for sharing this with so much of detailed information.عفونت واژن
That was such a cool article
How Much Time Did You Spend On This Powerful Article?
Thank you so much
Thanks for sharing this blog.
Have a woderful day.انحصار وراثت
Keep sharing such informative post. These tips may help me in the future.thank you very much.hsv چیست
Do not be bored and special thanks for your service
The content was really useful and great Good luck
I’m so glad I got to know your site
Good time
that was perfect
It was the best
It was the most beautiful
Hi
It was the best I saw
wish you luck
Hi
The material was very useful
Thank you for this useful and valuable material
Good post. I absolutely love this website. Thanks!
Thanks for sharing your information, it’s great and I appreciate it!
i’m wonder about it was so new for me.I stumbled onto your blog and read a few post.کلسترول نرمال
i read the articleit has a really new subjectYou will become . آزمایشگاه مرکزی
that they can use this .Cool post with lots of information.وکیل ارث
Hello, good day, this page was very enjoyable for me and I really enjoyed its content. Thank you
Very Nice Website, I really Appreciate your contents, this is very meaning for us.
Lucky me I recently found your website and i can’t stop reading your blog
I can’t quit your site!
Thank you very Much For Sharing this Useful information
Another great topic to notice, loved it, thank for created such a great topic.
https://bigmotion.ir/product-category/aftereffects-templates
That is amazing. Thank you so much for sharing this post.
Thank you very Much For Sharing this Useful information جعبه انگشتر
Thank you very Much For Sharing this Useful information
gooooooooooood music
That is amazing. Thank you so much for sharing this post.
tehranmelody buy
Very Nice Website, I really Appreciate your contents, this is very meaning for us.
Wonderful post,This article have helped greatly continue writing.تزریقات کودکان
Nicely done article. Everything is well polished and perfectly written.سمعک زیمنس
Hii,
This is Great Post.. for me, Thanks for sharing with us!! https://www.socializeclub.com/services/buy-real-facebook-live-stream-views/
thanks very good article
Thank you for sharing this information with us
I’m really impressed with your writing skills.thank you very much for sharing.کسیژن خون نرمال
I’m really impressed with your writing skills.thank you very much.کسیژن خون نرمال
I have special thanks to the producer of this content
Great blog thanks for the information
ok mas kur kuh makacih
You have really creative ideas. It’s all interesting. I’m not tired of reading at all.
ijin taruh website om
Keep posting like this informative articles.thanks.خرید واکسن hpv
Hello, have a good day
Thank you for the article here, it was very useful and valuable for me. Thank you for the time and energy you give to us, the audience.
Very nice blog post. I certainly appreciate this site.
The COUNTBLANK function is one of the Statistical functions of Excel.
It counts the number of empty cells in a specified range of cells.
We can find this function in Statistical category of insert function Tab.
The COUNTBLANK function is one of the Statistical functions of Excel.
It counts the number of empty cells in a specified range of cells.
We can find this function in Statistical category of insert function Tab.
Thank you very Much For Sharing this Useful information
https://musicya.ir/mazani-music/
My husband and i felt now thankful Edward managed to do his investigation from the precious recommendations he grabbed out of your blog. It’s not at all simplistic just to be handing out helpful tips which some people have been making money from. And we figure out we’ve got the website owner to thank for that. The entire illustrations you’ve made, the simple web site menu, the relationships you can assist to engender – it’s most incredible, and it’s assisting our son in addition to the family recognize that this situation is pleasurable, which is certainly extraordinarily indispensable. Thank you for the whole thing!
Hello
What a post I’ve been looking for, thank you for giving me useful information and please keep posting good information.
I will visit you often. Thank you.
I am also running the site, and its a similar site.
So feel free to check in and explore cause they are helpful and informative.
If you have any questions, please visit my site and read what kind of blogs I am posting. I am sure it will be interesting.
Have a niceday !
https://www.automymo.com
the best resource for learning excel functions and formulas. ultimate guide to excel math, database, logical, text, date, information and other functions.
A PivotTable takes rows and rows of data and lets you create a nice little summary table of that data based upon your chosen parameters.
I am very happy to visit your blog. Your artical helped me a lot thanks the information. I also like your blog theme, can you tell me how you did it. Thank you for this article and blog and I am waiting for your new post.
aq sangat terhura hura
I truely like your blog submit . You have simply shared a informative and interesting weblog put up .
Wonderful article, thanks for sharing
Thank you for sharing.
I am very lucky to have come across this article.
Its really amazing to read it .Its really amazing to read it .
Great post thank you.
Thanks to the dear administrator of this site
Please always keep your site updated so that we can use and benefit from its posts
Thank
دانلود آهنگ
Thank you for sharing this. If you need any service to pipe opening and sewer cleaning. https://hamrah.academy/internship
Greetings! Very helpful advice on this article! It is the little changes that make the biggest changes. Thanks a lot for sharing!
https://www.instagram.com/upvc_artin
It is the little changes that make the biggest changes. Thanks a lot for sharing
If you need any service to pipe opening and sewer cleaning
https://carokia.com/counseling
Wonderful article, thanks for sharing
Thank you for sharing.
I am very lucky to have come across this article.
Its really amazing to read it .Its really amazing to read it .
Great post thank you
thanks for spending time to childs
thanks for spending time to childs
Inevitably, from these good posts, they are subscribed by a buzzer
Thank you for your good content. Visit the site
https://delesir.com/
SMM Panel One offers the best SMM services that are simply accessible to everyone. Through our genuine SMM panel services, we have assisted many businesses in gaining greater insights. If you choose us for your business, then we can help you develop your online presence across multiple social media platforms such as Facebook, Instagram, LinkedIn, YouTube, etc. because we believe in 100% customer satisfaction.
It was a valuable and good article. Thank you for your unique website.
https://jakharid.ir/espresso-maker/
One of the types of visa for مهاجرت تحصیلی is the study visa, which is actually a permission to travel, travel, study, live and work in the destination country for students who have received the study application. Obtaining a study visa is obligatory and necessary for students who intend to study in a country. Obtaining a study visa for study migration to other countries is allowed from the age of 4. People’s preference for immigrating to Europe or countries like Canada and Australia is different.
Wonderful article
hi Your site is very beautiful and full of content tnxxx
I recently had the most incredible Bali tour with EZGo Travel! From start to finish, they provided an unforgettable experience. Their attention to detail, friendly guides, and perfectly planned itinerary made every moment extraordinary. I explored Bali’s stunning landscapes, immersed myself in its rich culture, and indulged in delicious cuisine. EZGo Travel exceeded my expectations and created memories that will last a lifetime. Highly recommended for anyone seeking an amazing Bali adventure!
Weather
I am browsing this web site and reading very informative articles here.
thanks verg good info
Very good written story. It will be valuable to everyone who employess it, including me. Keep up the good work – can’r wait to read more posts.
This website has been created to cater for the need of the teeming population of those people
Thanks for sharing your information, it’s great and I appreciate it!
Thanks for sharing your information, it’s great and I appreciate it!
Very good written story. It will be valuable to everyone who employess it, including me. Keep up the good work – can’r wait to read more posts.
hi Your site is very beautiful and full of content tnxxx
Wonderful article
Thank you for your good content. Visit the site
tanx very good
This piece of writing will help the internet viewers to create a new weblog or even a blog from start to end.
Thank you hipwee this article is the best
Very interesting information and I am really glad to get this information.
Very interesting information and I am really glad to get this information.
Thank you for this very nice article
Great tutorial, I save it to finish my school project
Great tutorial, I save it to finish my school project
Nice Blog and So Informative blog Caryy on- IF You are intrested in Exibition Stands builders
Hello
Comprehensive content was useful
But it could be more complete
Hello
The content was useful and excellent
Good luck and win
Wonderful post, I really liked it. Great respect for the author. It is very interesting and Informative. Know Booth design in Amsterdam and More Details Visit – Fountainheadint
Very interesting information and I am really glad to get this information :)
Very interesting information and I am really glad to get this information :)
Very interesting information and I am really glad to get this information :)
Nice Blog and So Informative blog Caryy on- IF You are intrested in Exibition Stands builders
Wonderful content very interesting informations, happy to read that
Our local knowledge of the complexity of Thai markets is bound unparalleled. However, we understand the big picture with a global perspective that will help your business interests prosper.
Laundry Bangkok offers a wide range of professional cleaning services for both residential and commercial customers. Trust us to handle all your laundry needs.
A prestigious program that recognizes and celebrates excellence in the spa industry worldwide. The awards honor spas and wellness centers that offer exceptional services and experiences, based on a range of criteria including facilities, treatments, and customer service.
Hello
The content was very complete
thank you
Amazing post! The required details for heart of Bavaria, exhibition stand contractor in munich orchestrate a symphony of creativity and precision. From the iconic Oktoberfest grounds to cutting-edge trade shows, Munich’s builders infuse each stand with a unique blend of cultural richness and contemporary flair. With an eye for detail and a commitment to innovation, they elevate brands, creating memorable experiences that resonate long after the event curtains close.
i dont like comments but when I do, it means you must be a good content creator. Trust me you will be a great literature teacher.
Amazing and full of praise
ama della parika skontacha kheli khari ke dari mikhoni
you should sell them :)
This is a valuable and informative post, thanks for sharing.
Keep up the good work with and very informative blog
Pretty! This has been a really wonderful post
Very interesting information and I am really glad to get this information.
Would love to constantly get updated great blog
I got a lot of information by reading it, thank you.
Very excellent info can be found on web site
Final chapter
This is a valuable and informative post, thanks for sharing.
Simai Mandagh International Hairdressing School is one of the most prestigious hairdressing schools in Iran. With more than 20 years of experience in the field of hairdressing education, this school offers its students various courses including bridal hairdressing, eyebrow design, nail planting, professional make-up, hair chignon, color and mesh, micropigmentation, etc. This school has an experienced and professional staff of teachers who teach their trainees using up-to-date and modern materials and equipment.
It was an interesting article, thank you
wow such a good post thanks a lot its really usefull
https://tehradio.com/
It was useful and good
Of course, it could be the whole semester
I enjoyed this article very much
Frustrating Doozies gummies looking for the first ease was an eye-opening experience. The relaxation and euphoria were unexpected but welcomed. It enhanced my sensory idea and sparked a newfound aggrandizement as a remedy for music and art. Regardless, the earnest hunger caught me off guard. Entire, it was a remarkable introduction to a late happy of sensations.
Maddening Cannabis Drinks in the interest the pre-eminent ease was an eye-opening experience. The relaxation and euphoria were unexpected but welcomed. It enhanced my sensory idea and sparked a newfound aggrandizement for music and art. Degree, the profound emptiness caught me off guard. Comprehensive, it was a catchy introduction to a late everyone of sensations.
The article is old but interesting
A prestigious program that recognizes and celebrates excellence in the spa industry worldwide. دانلود آهنگ کردی شاد you can see our web site.
Old but interesting
Thanks you, I am very interesting with this DIY. I will save your site on my bookmark
I tried https://greenrevolutioncbd.com/choose-experience/cbd-for-focus/ in the interest of the first heyday model week, and I’m genuinely surprised by the results. I’ve struggled with eagerness and accessory sleeplessness, and CBD seemed to offer a subtle, still efficient, have of calm and relaxation. There was no ‘far up,’ no more than a compassionate easing of my foreboding symptoms and a more restful night’s sleep. It tasted a grain earthy, but that’s a small trade-off looking for instinct more at peace. I’m looking advance to seeing how it helps in the great run.
Finally, I complete the diy project from school
Hello, I am Arzoo Kanak from Chandigarh, I understand that every person has unique desires and fantasies. That’s why I’m offering a wide range of services to ensure that your experience with me in bed is memorable. Your satisfaction is our first priority, plus we have a diverse collection of beautiful girls to spend a romantic night with you. https://www.arzookanak.in
Exploring hemp flower for sale and pre roll weed has been an enlightening passing as me. The quality and bouquet of these products are stirring, oblation a calming and enjoyable experience. Whether I’m unwinding after a crave day or seeking creative enthusiasm, hemp pre-rolls take measures a understandable surrogate that I can trust. The convenience of pre-rolls combined with the benefits of hemp flowers secure them a go-to voice for the treatment of relaxation and mindfulness. I know the limelight to group specifically and purity of the products, enhancing my overall satisfaction. Highly advocate trying hemp flowers and pre-rolls for a holistic and fulfilling experience!
My dear friends, My name is Seerat Kaur and I am a free independent call girl in Delhi but now I live in Jaipur. I am a student and I am working on this link because I need money for myself। https://www.jasmeenkaur.in
The content was very complete
Thankful
The content was very complete
Thankful
Do you own a coffee shop? And are you looking for a website design collection? We are one of the best coffee shop website design collections in Iran and we professionally design coffee shop or related websites. We help people who have coffee shops to offer their products and services to their customers online.
Thanks for the good and rich content site you have. You can leave your repairs to us.
You have worked hard to share this info. I am very glad to read this. Thanks for sharing.
I love surfing. Glad I found your site.
Excellent post. This article is very helpful for the people and also for me. I get the some useful knowledge in this post. Thanks for sharing the informative topic, by the way. Here exhibition stand builders in munich is an artful process where creativity converges with precision engineering. This specialized discipline involves the meticulous construction of stands that not only showcase a brand’s essence but also provide a platform for meaningful engagement. Fabrication experts employ advanced materials, seamlessly blending aesthetics with structural integrity. The emphasis on modular designs ensures adaptability to diverse spaces, while cutting-edge technology integration transforms stands into interactive hubs. From concept to reality, exhibition stand fabrication is a symphony of skill and innovation, producing captivating structures that make a lasting impact in the dynamic landscape of trade shows and exhibitions.
Thanks for the good and rich content site you have. You can leave your repairs to us.
Thanks for the good and rich content site you have. You can leave your repairs to us.
Thanks for the good and rich content site you have. You can leave your repairs to us.
{ 38 trackbacks }