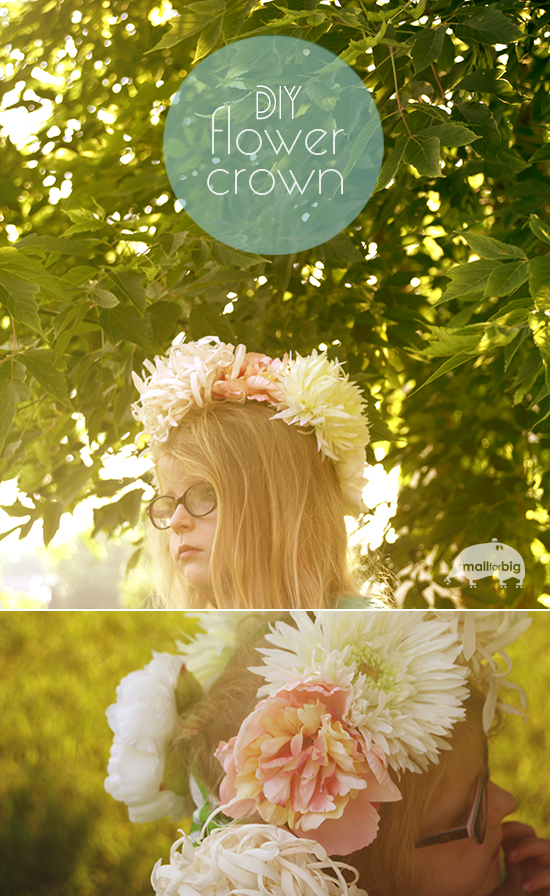
Have you noticed flower accesories are taking over Pinterest and Etsy lately? Big, luscious, over-the-top cornucopias of florals. My favorite finds are the gorgeous headpieces. Every time I see one, I want one.
But clearly in my day-to-day life it’s a rather useless accessory. I wonder what the moms at preschool pickup would say if they saw me wearing one? BUT. Then I realized, as usual, the perfect way to indulge my little fantasy was to make one for Birdie!

So here we are. A super luxe boho fairy crown to fulfill your every woodland fantasy. For you, or for all the little girls in your life!
What you’ll need:
- Faux fabric flowers from the craft store. I waited until they were 50% off at JoAnn’s, which happens fairly regularly.
- Wide ribbon – I think our grosgrain is 1.5″ wide.
- Hot glue gun. Preferably a regular temp glue gun, not the low temp.
What you’ll do:
- Begin by popping all the flower heads off of their stems. This was surprisingly easy with my assortment, you just pull!
- Then, grab a scissors and cut off as much of the remaining stem on the flower as possible – the flatter the back of the flower, the easier it is to glue to the ribbon. See the photos below:

- Measure your child’s head (or yours). Birdie’s was about 21″.
- Cut a piece of ribbon that is about 16″ longer than the head circumference you want. That gives you 8″ of extra ribbon on each side. See photo below.
- Lay the ribbon flat on the table. Use tape to layout the head circumference. Then take your flowers and arrange them in the order you like best. See photo below.
- Then get out the glue gun! I slathered glue all over the back of each flower, then attached it to the ribbon. Snuggle them tight together, because when it’s curved around the head they will have more space.
- Please note. I was stuck with a low-temp glue gun and the first time the flowers began to fall off. I discovered with the lower temp glue that you need to put the ribbon on a soft surface, like our living room rug, and then press the flowers deeply into the ribbon. The softer surface allowed the ribbon to wrap up around the flower better, and now they’re firmly attached. Press for 30 seconds! (I have a feeling with a regular temp glue gun this won’t be such a big problem).
- Tie a knot in the back, and flounce around the house, the yard, or maybe preschool pick up!


{ 9 comments… read them below or add one }
This is beautiful! Great tutorial :)
Would be great for bridesmaids too – especially for an outdoor wedding. Really lovely, well done.
Oh that’s a wonderful idea, it would be lovely! Thank you!
How sweet! I love flower crowns, especially big and luscious ones like yours!
Thanks Tan! They’re just so summery aren’t they?
I am DYING with the beauty and brilliance of this project, Mari. I completely ADORE it.
p.s. Your daughter is absolutely precious! I love her expression in the last shot! Such a doll!
Thank you! I had a heckuva time narrowing the photos of her for this post, but I’m a little biased ;) The shoot started out like this though: http://instagram.com/p/bm1pefnzYu/
Oh how gorgeous are they. I think I shall make one of those for myself.
Oh I hope you do – just in time for Spring!
Adorable! Thank you for sharing. Might I ask where did you get your daughter’s glasses? I struggle to find cute glasses for my 5 yr. old daughter.
{ 3 trackbacks }